Ads By CbproAds

Wednesday, February 25, 2009

In an operational system, tubes carry coolant to and from water blocks.


If you decide to install a liquid-cooling system in your computer, it's a good idea to let the pump circulate the fluid for a while so you can check for leaks. Keep your computer turned off during this test period so you'll be less likely to damage your hardware if a leak does occur.
Once you're sure that everything is watertight, boot up the computer. You can check the temperature of your components in your computer's BIOS menu or by using a third-party application that monitors temperature. If necessary, you can also apply smaller heat sinks to RAM chips and other higher-temperature components in your system.

How Liquid-cooled PCs Work


A liquid-cooling system for a PC is a lot like a cooling system for a car. Coolant flows through channels in a car's engine block, and the rest of the cooling system incorporates:
A pump that moves coolant through the system
A radiator that dispels heat into the air
A fan that moves air over the radiator
A coolant reservoir that holds extra fluid and allows easy addition of coolant
Hoses that connect the different parts of the system

These water blocks can cool a GPU, a CPU and a northbridge.
Many electronic components do not tolerate direct contact with liquid. So instead of using channels to pump liquid directly through microchips as in a car engine, a liquid-cooled PC uses water blocks. A water block is a piece of heat-conductive metal, like copper or aluminum, that's filled with hollow tubes and channels. The bottom of the water block is a flat piece of metal that sits directly on top of the chip being cooled. Thermal paste between the chip and the block improves the heat transfer between the two surfaces. The chip heats the block, and the water absorbs the heat as it flows through all the channels.
Many central processing unit (CPU) water blocks are universal, but some graphics processing unit (GPU) water blocks only work with specific chips. You can also find water blocks designed to cool other high-temperature chipsets, like the northbridge, which connects your CPU to your memory. Usually, small bolts and washers attach the water block to the necessary printed circuit board (PCB), such as the motherboard or video card.
The rest of a liquid-cooling system's components are much like those found in a car's cooling system. Most liquid-cooled PCs have:
A pump
A radiator
A fan
A coolant reservoir
Tubing
A centrifugal pump like the one used in your car
The pump is usually a centrifugal pump, much like you'd find in a car's cooling system. Some liquid-cooling pumps are submersible, and you can place them directly inside the coolant reservoir. Others need to be kept dry. If you're thinking about using a submersible pump, make sure its exterior doesn't get hot enough to heat all the fluid in the reservoir.
The pump is one of the most important parts of the system. Its flow rate determines how quickly the coolant moves through the tubes and blocks. If the water moves too quickly, it doesn't have time to absorb heat before moving on. If it moves too slowly, too much heat can build up around sensitive components. The complexity of the system affects the overall flow rate - the more resistance the fluid encounters within the blocks and radiator, the slower the overall flow rate.
The pump also has to be strong enough to move the liquid from the lowest point in the system to the highest. This is known as head pressure or vertical pressure, and it's especially important when liquid cooling tall server towers.

How Graphics Cards Work


A top-of-the-line graphics card is easy to spot. It has lots of memoryand a fast processor. Often, it's also more visually appealing than anything else that's intended to go inside a computer's case. Lots of high-performance video cards are illustrated or have decorative fans or heat sinks.
But a high-end card provides more power than most people really need. People who use their computers primarily for e-mail, word processing or Web surfing can find all the necessary graphics support on a motherboard with integrated graphics. A mid-range card is sufficient for most casual gamers. People who need the power of a high-end card include gaming enthusiasts and people who do lots of 3-D graphic work.

good overall measurement of a card's performance is its frame rate, measured in frames per second (FPS). The frame rate describes how many complete images the card can display per second. The human eye can process about 25 frames every second, but fast-action games require a frame rate of at least 60 FPS to provide smooth animation and scrolling. Components of the frame rate are:
Triangles or vertices per second: 3-D images are made of triangles, or polygons. This measurement describes how quickly the GPU can calculate the whole polygon or the vertices that define it. In general, it describes how quickly the card builds a wire frame image.
Pixel fill rate: This measurement describes how many pixels the GPU can process in a second, which translates to how quickly it can rasterize the image.

The graphics card's hardware directly affects its speed. These are the hardware specifications that most affect the card's speed and the units in which they are measured:
GPU clock speed (MHz)
Size of the memory bus (bits)
Amount of available memory (MB)
Memory clock rate (MHz)
Memory bandwidth (GB/s)
RAMDAC speed (MHz)
­ The computer's CPU and motherboard also play a part, since a very fast graphics card can't compensate for a motherboard's inability to deliver data quickly. Similarly, the card's connection to the motherboard and the speed at which it can get instructions from the CPU affect its performance.

How Sound Cards Work


Not every computer has a sound card. Some motherboards feature integrated audio support instead. A motherboard that has its own DSP can process multiple data streams. It may also support 3-D positional and Dolby surround sound. However, in spite of these features, most reviewers agree that separate sound cards provide better audio quality.


Laptops usually have integrated sound capabilities on their motherboards or small sound cards. However, space and temperature control considerations make top-of-the-line internal cards impractical. So, laptop users can purchase external sound controllers, which use USB or FireWire connections. These external modules can significantly improve laptop sound quality.

Will PCI be replaced by HyperTransport?


PCI-Express, developed by Intel (and formerly know as 3GIO or 3rd Generation I/O), looks to be the "next big thing" in bus technology. At first, faster buses were developed for high-end servers. These were called PCI-X and PCI-X 2.0, but they weren't suitable for the home computer market, because it was very expensive to build motherboards with PCI-X.
PCI-Express is a completely different beast - it is aimed at the home computer market, and could revolutionize not only the performance of computers, but also the very shape and form of home computer systems. This new bus isn't just faster and capable of handling more bandwidth than PCI. PCI-Express is a point-to-point system, which allows for better performance and might even make the manufacturing of motherboards cheaper. PCI-Express slots will also accept older PCI cards, which will help them become popular more quickly than they would if everyone's PCI components were suddenly useless.
It's also scalable. A basic PCI-Express slot will be a 1x connection. This will provide enough bandwidth for high-speed Internet connections and other peripherals. The 1x means that there is one lane to carry data. If a component requires more bandwidth, PCI-Express 2x, 4x, 8x, and 16x slots can be built into motherboards, adding more lanes and allowing the system to carry more data through the connection. In fact, PCI-Express 16x slots are already available in place of the AGP graphics card slot on some motherboards. PCI-Express 16x video cards are at the cutting edge right now, costing more than $500. As prices come down and motherboards built to handle the newer cards become more common, AGP could fade into history.

This motherboard has four PCI slots.


You open up your computer's case and plug the sound card into an empty PCI slot on the motherboard.
You close the computer's case and power up the computer.
The system BIOS initiates the PnP BIOS.


The PnP BIOS scans the PCI bus for hardware. It does this by sending out a signal to any device connected to the bus, asking the device who it is.
The sound card responds by identifying itself. The device ID is sent back across the bus to the BIOS.
The PnP BIOS checks the ESCD to see if the configuration data for the sound card is already present. Since the sound card was just installed, there is no existing ESCD record for it.
The PnP BIOS assigns IRQ, DMA, memory address and I/O settings to the sound card and saves the data in the ESCD.
Windows XP boots up. It checks the ESCD and the PCI bus. The operating system detects that the sound card is a new device and displays a small window telling you that Windows has found new hardware and is determining what it is.
In many cases, Windows XP will identify the device, find and load the necessary drivers, and you'll be ready to go. If not, the "Found New Hardware Wizard" will open up. This will direct you to install drivers off of the disc that came with the sound card.
Once the driver is installed, the device should be ready for use. Some devices may require that you restart the computer before you can use them. In our example, the sound card is immediately ready for use.
You want to capture some audio from an external tape deck that you have plugged into the sound card. You set up the recording software that came with the sound card and begin to record.
The audio comes into the sound card via an external audio connector. The sound card converts the analog signal to a digital signal.
The digital audio data from the sound card is carried across the PCI bus to the bus controller. The controller determines which device on the PCI device has priority to send data to the CPU. It also checks to see if data is going directly to the CPU or to system memory.
Since the sound card is in record mode, the bus controller assigns a high priority to the data coming from it and sends the sound card's data over the bus bridge to the system bus.
The system bus saves the data in system memory. Once the recording is complete, you can decide whether the data from the sound card is saved to a hard drive or retained in memory for additional processing.
As processor speeds steadily climb in the GHz range, many companies are working feverishly to develop a next-generation bus standard. Many feel that PCI, like ISA before it, is fast approaching the upper limit of what it can do.
All of the proposed new standards have something in common. They propose doing away with the shared-bus technology used in PCI and moving to a point-to-point switching connection. This means that a direct connection between two devices (nodes) on the bus is established while they are communicating with each other. Basically, while these two nodes are talking, no other device can access that path. By providing multiple direct links, such a bus can allow several devices to communicate with no chance of slowing each other down.
HyperTransport, a standard proposed by Advanced Micro Devices, Inc. (AMD), is touted by AMD as the natural progression from PCI. For each session between nodes, it provides two point-to-point links. Each link can be anywhere from 2 bits to 32 bits wide, supporting a maximum transfer rate of 6.4 GB per second. HyperTransport is designed specifically for connecting internal computer components to each other, not for connecting external devices such as removable drives. The development of bridge chips will enable PCI devices to access the HyperTransport bus.

Adding RAM to Your Desktop


­Once you've chosen the right kind of RAM, it's time to install your RAM module into the insides of your desktop. Before you get started, make sure your desktop has been turned off and unplugged from any outlets. Opening up your computer while there's a power source connected to it is dangerous, so to avoid any electrical accidents it's a good idea to make sure you handle everything carefully. You should also ground yourself by touching a metal surface or wearing an antistatic wrist strap. This prevents electrostatic discharge, something many of us have experienced by dragging our feet over a rug, touching a doorknob (or another person) and creating a spark. This happens when two objects touch or rub together and exchange electrons -- one becomes positively charged, the other negatively charged. When one object touches another that has an opposite charge, electrons shoot out to balance the charges. Static charges may give us a harmless shock when we touch a doorknob, but they can damage computer equipment, so grounding yourself will protect sensitive components.
Desktop computers are designed many different ways, but most have either side doors or tops that can be removed with the help of a screwdriver. The RAM slots are located on the computer's motherboard. There are usually two slots, though there may be more. If all slots are filled up with existing RAM modules, you can replace a smaller RAM chip with a larger one. Just release the tabs that hold the module down, remove the old module and insert the new, larger one. If there's a slot open, you simply can slide the new module in place and gently snap it into position.
Once you've installed the RAM, and after you've closed up your desktop safely and properly, you can start up your computer. The system should recognize the new RAM automatically. Now your desktop will boot up faster, run applications more efficiently and switch between programs with noticeable ease.

184-pin DDR DIMM RAM


Much of the memory available today is dual data rate (DDR) memory. This means that the memory can transmit data twice per cycle instead of once, which makes the memory faster. Also, most motherboards have space for multiple memory chips, and on newer motherboards, they often connect to the northbridge via a dual bus instead of a single bus. This further reduces the amount of time it takes for the processor to get information from the memory.

Sunday, February 22, 2009

Show Hidden Devices

You can show hidden devices in the Device Manager. One way is by making a simple registry change. The other is through a batch file.
Registry Change:
Go to HKEY_LOCAL_MACHINE \ SYSTEM \ ControlSet001 \ Control \ Session Manager \ Environment
Create a string DEVMGR_SHOW_NONPRESENT_DEVICES
Give it a value of 1

Disable Passport Pop-Up

Normally, WindowsXP will prompt you 10 times that You Need a Passport to use WindowsXP Internet communication features...
To disable this
Start Regedit
Go to HKEY_CURRENT_USER \ Software \ Microsoft \ MessengerService
Edit the binary key PassportBalloon
Give it a value of 0A (0A 00 00 00)

Disable Explorer Thumbnail View

If you want disable the Explorer's ability to show the Thumbnail View ,
Start Regedit
Go to HKEY_CURRENT_USER \ Software \ Microsoft \ Windows \ CurrentVersion \ Explorer \ Advanced \
Change ClassicViewState to 1

Preventing Applications from Stealing the Focus

To prevent applications from stealing the focus from the window you are working
Start Regedit
Go to HKEY_CURRENT_USER \ Control Panel \ Desktop
Edit the key ForegroundLockTimeout
Give it a value of 00030d40

Installing Java Virtual Machine

If you are getting errors when browsing the web to install Java Virtual Machine,
You can still download it from Microsoft (version 3810)If this link is removed by MS or is too slow you can download it here
If you need a previous version, you can download 3805
It is now included in Service Pack3

Stop Password Expiration

If you want to do this for all users, enter:
Start / Run / net accounts /maxpwage:unlimited
Added 3/18/02
If you are getting an error message that your password is about to expire:
Right click on the My Computer icon
Select Manage
Go to Local Users and Groups / Users
Right-click on the user you want to change
Select Properties
On the General tab, check Password never expires
Click OK

Remembering Folder Settings

If XP does not remember your folder settings, delete or rename the following registry keys
[HKEY_CURRENT_USER\Software\Microsoft\Windows\ShellNoRoam\BagMRU][HKEY_CURRENT_USER\Software\Microsoft\Windows\ShellNoRoam\Bags]

Poweroff at Shutdown

If your computer does not turn off the power when doing a shutdown,you may need to edit the registry. I have all the correct BIOS and Power settings and still needed to do this.
Start Regedit
Go to HKEY_CURRENT_USER\Control Panel\Desktop
Edit the key PowerOffActive and give it a value of 1
You can do the same in HKEY_USERS\.DEFAULT\Control Panel\Desktop

Hiding the Last User Logged On

If you use the standard NT style of login and want to hide the last user:
Start the Group Policy Editor (gpedit.msc)
Go to Computer Configuration / Windows Settings / Security Settings / Local Policies / Security Options
Scroll down to Interactive logon: Do not display last user name
Set it to Enable

Increasing the Folder Cache

The default setting for WindowsXP is to cache the Explorer settings for 400 folders.To increase it:
Start Regedit
Go to HKEY_CURRENT_USER\Software\Microsoft\Windows\ShellNoRoam
Change the vaule of BagMRU to whatever size you want (hex)
1000 - 3e82000 - 7d03000 - bb84000 - fa05000 - 1388

Adding TCP/IP Printers

To create a connection to a printer connected to your network:
Start to add a new printer through the control panel.
Select Local Printer / Next
Instead of a LPT port, check Create a new port at the bottom on the window
Scroll to Standard TCP/IP Port
Keep going and enter the IP address of the printer.

Bringing Up the Shutdown Dialog Box

Create a new txt file somewhere on your system, open it and put in this one line: (new ActiveXObject("Shell.Application")).ShutdownWindows();
Save and Close the file. Change the extension to js and your got it.
You can make a shortcut to that file to make it easy to shut down your system.

NTLDR or NTDETECT.COM Not Found

If you get an error that NTLDR is not found during bootup,
If you have FAT32 partitions, it is much simpler than with NTFS. Just boot with a Win98 floppy and copy the NTLDR or NTDETECT.COM files from the i386 directory to the root of the C:\ drive.
For NTFS:
Insert and boot from your WindowsXP CD.
At the first R=Repair option, press the R key
Press the number that corresponds to the correct location for the installation of Windows you want to repair.Typically this will be #1
Enter in the administrator password when requested
Enter in the following commands (X: is replaced by the actual drive letter that is assigned to the CD ROM drive.COPY X:\i386\NTLDR C\: COPY X:\i386\NTDETECT.COM C:\
Take out the CD ROM and type exit

Corrupted or Missing \WINDOWS\SYSTEM32\CONFIG

If you get the error:Windows could not start because the following files is missing or corrupt\WINDOWS\SYSTEM32\CONFIG\SYSTEM or \WINDOWS\SYSTEM32\CONFIG\SOFTWARE
Insert and boot from your WindowsXP CD.
At the first R=Repair option, press the R key
Press the number that corresponds to the correct location for the installation of Windows you want to repair.Typically this will be #1
Enter in the administrator password when requested
cd \windows\system32\config
Depending on which section was corrupted:ren software software.bad or ren system system.bad
Depending on which section was corruptedcopy \windows\repair\systemcopy \windows\repair\software
Take out the CD ROM and type exit

HAL.DLL Missing or Corrupt

If you get an error regarding a missing or corrupt hal.dll file, it might simply be the BOOT.INI file on the root of the C: drive that is misconfigured
Insert and boot from your WindowsXP CD.
At the first R=Repair option, press the R key
Press the number that corresponds to the correct location for the installation of Windows you want to repair.Typically this will be #1
Type bootcfg /list to show the current entries in the BOOT.INI file
Type bootcfg /rebuild to repair it
Take out the CD ROM and type exit

NTOSKRNL Missing or Corrupt

If you get an error that NTOSKRNL not found:
Insert and boot from your WindowsXP CD.
At the first R=Repair option, press the R key
Press the number that corresponds to the correct location for the installation of Windows you want to repair.Typically this will be #1
Change to the drive that has the CD ROM.
CD i386
expand ntkrnlmp.ex_ C:\Windows\System32\ntoskrnl.exe
If WindowsXP is installed in a different location, just make the necessary change to C:\Windows
Take out the CD ROM and type exit

Repair Install

If XP is corrupted to the point where none of the previous solutions get it to boot,you can do a Repair Install that might work as well as keep the current settings. Make sure you have your valid WindowsXP key.The whole process takes about half an hour depending on your computerIf you are being prompted for the administrator's password, you need to choose the 2nd repair option, not the first.
Insert and boot from your WindowsXP CD
At the second R=Repair option, press the R key
This will start the repair
Press F8 for I Agree at the Licensing Agreement
Press R when the directory where WindowsXP is installed is shown. Typically this is C:\WINDOWS
It will then check the C: drive and start copying files
It will automatically reboot when needed. Keep the CD in the drive.
You will then see the graphic part of the repair that is like during a normal install of XP (Collecting Information, Dynamic Update, Preparing Installation, Installing Windows, Finalizing Installation)
When prompted, click on the Next button
When prompted, enter your XP key
Normally you will want to keep the same Workgroup or Domain name
The computer will reboot
Then you will have the same screens as a normal XP Install
Activate if you want (usually a good idea)
Register if you want (but not necessary)
Finish
At this point you should be able to log in with any existing accounts.

Accessing Non-Listed Display Configurations

If you want to access display configurations not normally listed (e.g. 256 colors)
In the Display Properties dialog box, click the Settings tab.
Click the Advanced button.
Click the Adapter tab,
Click the List all modes button.
Select the resolution, color depth, and refresh rate that you want and click OK.

Not Displaying Logon, Logoff, Startup and Shutdown Status Messages

To turn these off:
Start Regedit
Go to HKEY_LOCAL_MACHINE\SOFTWARE\Microsoft\Windows\CurrentVersion\policies\system
If it is not already there, create a DWORD value named DisableStatusMessages
Give it a value of 1

Cleaning the Prefetch Directory

WindowsXP has a new feature called Prefetch. This keeps a shortcut to recently used programs. However it can fill up with old and obsolete programs.
To clean this periodically go to:
Star / Run / Prefetch
Press Ctrl-A to highlight all the files
Delete them

Faster DOS Printing

If you are experiencing slow printing for DOS programs with Windows2000
Go Start Run Regedit
Click Hkey_Local_Machine
Click on System
Click CurrentControlSet
Click Control
Go to the bottom of this part of the list and click WOW
Click LPT timeout and change it to a 3

Stopping the Messenger Service

To remove the ability for anyone in the world to pop up messages on your computer, you can disable the Messenger service.
Click Start->Settings ->Control Panel
Click Performance and Maintenance
Click Administrative Tools
Double click Services
Scroll down and highlight "Messenger"
Right-click the highlighted line and choose Properties
Click the STOP button
Select Disable or Manual in the Startup Type scroll bar Click OK

Services You Can Disable

There are quite a few services you can disable from starting automatically. This would be to speed up your boot time and free resources.They are only suggestions so I suggestion you read the description of each one when you run Servicesand that you turn them off one at a time.Some possibilities are:
Alerter - Sends alert messages to specified users that are connected to the server computer.
Application Management - Allows software to tap directly into the Add/Remove Programs feature via the Windows Installer technology.
Background Intelligent Transfer Service - The Background Intelligent Transfer service is used by programs (such as Windows AutoUpdate) to download files by using spare bandwidth.
Clipbook - ClipBook permits you to cut and paste text and graphics over the network.
Error Reporting Service - Allows applications to send error reports to Microsoft in the event of an application fault.
Fast User Switching - Windows XP allows users to switch quickly between accounts, without requiring them to log off.
Help and Support - Allows the XP Built-in Help and Support Center to run.
IMAPI CD-Burning COM Service - You don't need this if you have other software to create CDs.
Indexing Service - Indexes contents and properties of files on local and remote computers; provides rapid access to files through flexible querying language.
IP SEC - Manages IP security policy and starts the ISAKMP/Oakley (IKE) and the IP security driver. If you are not on a domain, you likely don't need this running.
Messenger - Transmits net send and Alerter service messages between clients and servers. This is how a lot of pop-up windows start appearing on your desktop.
Net Logon - Supports pass-through authentication of account logon events for computers in a domain. If you are not on a domain, you don't need this running
Network DDE - Provides network transport and security for Dynamic Data Exchange (DDE) for programs running on the same computer or on different computers.
NT LM Security Support Provider - Provides security to remote procedure call (RPC) programs that use transports other than named pipes.
Performance Logs and Alerts - Collects performance data from local or remote computers based on preconfigured schedule parameters, then writes the data to a log or triggers an alert. If you don't need to monitor your performance logs, then you don't need this service.
Portable Media Serial Number - Retrieves the serial number of any portable music player connected to your computer
QOS RSVP - Provides network signaling and local traffic control setup functionality for QoS-aware programs and control applets.
Remote Desktop Help Session Manager - Manages and controls Remote Assistance. If you are not using Remote Desktop you don't need this service.
Remote Registry - Enables remote users to modify registry settings on this computer.
Routing & Remote Access - Offers routing services to businesses in local area and wide area network environments. Allows dial-in access.
Secondary Login - Enables starting processes under alternate credentials. This is what allows you to run an application as another user.
Smart Card - Manages access to smart cards read by this computer.
Smart Card Helper - Enables support for legacy non-plug and play smart-card readers used by this computer.
SSDP Discovery Service - Enables discovery of UPnP devices on your home network.
TCP/IP NetBIOS Helper - Enables support for NetBIOS over TCP/IP (NetBT) service and NetBIOS name resolution. This should not be needed in today's network environment.
Telnet - Enables a remote user to log on to this computer and run programs, and supports various TCP/IP Telnet clients.
Uninterruptible Power Supply Service - Manages an uninterruptible power supply (UPS) connected to the computer.
Universal Plug and Play Device Host - Provides support to host Universal Plug and Play devices
Upload Manager - Manages synchronous and asynchronous file transfers between clients and servers on the network.
Volume Shadow Copy Service - Manages and implements Volume Shadow Copies used for backup and other purposes.
Web Client - Enables Windows-based programs to create, access, and modify non-local files across the Internet.
Wireless Zero Configuration - Provides automatic configuration for the 802.11 adapters
WMI Performance Adapter - Provides performance library information from WMI HiPerf providers.

Stop Windows Messenger from loading

Open Windows Messenger or MSN Messenger, Go to Tools->Options. Click on the Preferences Tab. Then un-check "Run This program when Windows Starts."
Then If you use Outlook Express also go to tools->options in OE then uncheck "Automatically log on to MSN Messenger Service. (You may have to do this in Outlook also.)
Or In Windows XP, Navigate to (regedt32): HKEY_CURRENT_USER\Software\Microsoft\Windows\CurrentVersion\Run and delete MSMSGS.

Remove un-wanted programs in XP

This eKB will let you Remove Windows Components such as Windows Messenger, MSN Explorer, Pinball, Word Pad, Terminal Serve (XP Pro Only, Needed for Remote Desktop.) and programs in the Accessories menu on the All Programs menu.
Open Notepad (Start->All Programs->Accessories)
Click File, open. Navigate to the Windows folder or the WINNT folder if you upgraded from Win 2k or NT. Then open the INF folder. Open up the SYSOC.INF file.
Delete the HIDE towards the end of the line. Do not delete the commas. Don't put any spaces in-between the commas.
Sample sysoc.inf file: (Note all of them are listed here: MSN Explorer, Windows Movie Maker)========================================================[Version]Signature = "$Windows NT$"DriverVer=07/01/2001,5.1.2600.0[Components]NtComponents=ntoc.dll,NtOcSetupProc,,4WBEM=ocgen.dll,OcEntry,wbemoc.inf,hide,7Display=desk.cpl,DisplayOcSetupProc,,7Fax=fxsocm.dll,FaxOcmSetupProc,fxsocm.inf,,7NetOC=netoc.dll,NetOcSetupProc,netoc.inf,,7iis=iis.dll,OcEntry,iis.inf,,7com=comsetup.dll,OcEntry,comnt5.inf,hide,7dtc=msdtcstp.dll,OcEntry,dtcnt5.inf,hide,7IndexSrv_System = setupqry.dll,IndexSrv,setupqry.inf,,7TerminalServer=TsOc.dll, HydraOc, TsOc.inf,hide,2 <== Terminal Server (Disables Fast User Login, Remote Desktop.)msmq=msmqocm.dll,MsmqOcm,msmqocm.inf,,6ims=imsinsnt.dll,OcEntry,ims.inf,,7fp_extensions=fp40ext.dll,FrontPage4Extensions,fp40ext.inf,,7 AutoUpdate=ocgen.dll,OcEntry,au.inf,hide,7 <== Auto Updatemsmsgs=msgrocm.dll,OcEntry,msmsgs.inf,hide,7 <== Windows Messenger (aka MSN Messenger)RootAutoUpdate=ocgen.dll,OcEntry,rootau.inf,,7IEAccess=ocgen.dll,OcEntry,ieaccess.inf,,7Games=ocgen.dll,OcEntry,games.inf,,7 <== GamesAccessUtil=ocgen.dll,OcEntry,accessor.inf,,7CommApps=ocgen.dll,OcEntry,communic.inf,HIDE,7MultiM=ocgen.dll,OcEntry,multimed.inf,HIDE,7AccessOpt=ocgen.dll,OcEntry,optional.inf,HIDE,7Pinball=ocgen.dll,OcEntry,pinball.inf,HIDE,7 <== PinballMSWordPad=ocgen.dll,OcEntry,wordpad.inf,HIDE,7 <== WordPadZoneGames=zoneoc.dll,ZoneSetupProc,igames.inf,,7[Global]WindowTitle=%WindowTitle%WindowTitle.StandAlone="*"===========================================================
Click File, then save.
Open The Add or Remove Programs in Control Panel.
Click on Add/Remove Windows Components. You will now see options for Accessories and Utilities (the programs in the Accessories menu on the Start panel), MSN Explorer and several other components.
Remove the check next to the component to remove it or check it to install it from your XP CD.Please be careful what components you remove though.

Never re-activate Windows XP after a new re-installation.

This will only work if you have installed Windows XP on the computer once and have activated this. Moving this file to a different computer will NOT work. This is simply so you do not have to activate again. This helps if you are not near a phone or do not have Internet access. Simply copy the WPA.DBL from the c:\windows\system32 folder to a disk. Simply put it back in the same place once you re-install Windows XP.

Display The Hibernate option on XP's Shut Down dialog box.

You can simply enable it by holding down the SHIFT key while the Shut Down dialog is visible

How can I access the temp folder quickly?

This is known to work on Windows 98 Windows xp and up.
Start->Run Type "%temp%" without the quotes.
This uses the SET TEMP=C:\WINDOWS\TEMP that is in you autoexec.bat file. If it isn't in there add the line.

Print Screen


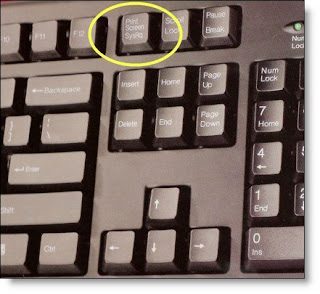
First get the layout you want on your monitor, then hit the PRINT SCREEN key. Next Open up a blank Word document or another word processor or drawing/graphics program. Select the edit menu, then paste. Extra tip: Hitting Alt+Print Screen at the same time copies the active window to the clipboard and not the whole screen

FoxConn MOTHERBOARD


FoxConn 925XE7AA-8EKRS2, ATX 24-pin, Intel Socket T LGA775 CPU's with 800mhz/1066mhz bus supports Hyper-Threading & FSB Dynamic Bus Inversion (DBI). Four Dual-Channel DIMM sockets support up to 4Gb 240-pin DDR2; Intel 925XE chipset (NorthBridge) w/heatsink & fan, Intel ICH6R Southbridge chipset w/heatsink, Silicon Image 3114 chipset; 3-PCI, 3-PCI Express x1, PCI Express x16 graphics slot; eight (8) SATA connectors (4x ICH6R supporting RAID 1, 0, 0+1, Matrix RAID; and 4x Silicon Image 3114 supporting RAID 0, 1, RAID 5, RAID 10, JBOD); three (3) ATA IDE connectors (1x ICH6R ATA100 & 2x ITE8212F ATA133) supporting RAID 0, 1, 0+1, JBOD; Floppy drive connector; 8 (4+4) USB2.0 supporting wake from S1 & S3 modes; 1394a FireWire (2x internal) and 1394b 800Mb/sec FireWire (backward compatible); DUAL Gigabit GbE 1000Mb LAN (Broadcom 5788KFB & Broadcom 5789KFB); Realtek 655 5.1 6-Channel audio AND Realtek ALC850 7.1 8-Channel Azalia audio (with digital SPDIF coaxial), supporting Intel High Definition Audio & High Quality Differential CD input. Rear ports: 9-pin Serial, LPT Parallel, two RJ-45 LAN, two PS/2 ports, SP/DIF out, four USB 2.0, 4-pin IEEE 1394b FireWire. Phoenix Award BIOS with overclocking options; PAT (Performance Accelerration Technology); Green function; PC Health status hardware monitoring for all voltages (even CMOS battery) and fan speeds; Supports: Wake on ring, Alarm, LAN, USB, PCI(x), keyboard & mouse; STR (Suspend-to-Ram), STD (Suspend-to-Disk), SuperSpeed, SuperBoot, SuperRecovery, SuperBIOS-Protect, SuperStep, SuperLogo, SuperUpdate. CE & FCC approved. FoxConn 925XE7AA-8EKRS2 image, quick specs(note these specs don't list all features), 925XE7AA-8EKRS2 manual (4.1mb). New, special presentation retail box edition with four (4) black 2-device rounded ATA133 cables, eight (8) black SATA cables (straight & 90° connectors), 4-port USB2.0 internal to external header bracket, 2-port IEEE 1394 FireWire internal to external header bracket (conventional plug and mini plug), four (4) 2-connector SATA power connector adapters, I/O Shield, driver and software CD w/Norton Internet Security, RAID floppies, motherboard manual, RAID MANUAL(Shipping weight about 7 lbs! This is one of the nicest motherboard packages we've ever seen)

PCPartner MOTHERBOARDS


PCPartner RC410AS7-A80C; ATX 24-pin format; Supports Hyper-Threading Intel Socket LGA775 Pentium 4, Pentium D & Celeron, and 64bit CPU's (.8v-1.6v); ATI RC410+SB450 chipsets; ATI Radeon Xpress 200 Video (ATI PCI-E X300 graphic core, Full screen/full speed video playback, 2048x1536, 15-pin, DirectX 9 & later support, with Integrated TV encoder Supports SurroundView with ATI PCI-E graphics card, Hardware Motion Compensation and iDCT & Hardware MPEG2 Decode DVD, 350MHz RAMDAC, Macrovision Support, ATI's exclusive "Composite Dot Crawl" freeze option for PAL and NTSC to improve the picture quality, S-Video & composite out), PLUS a separate PCI-Express x16 slot; two DIMM slots support up to 2GB 240-pin DDR-II 400/533/667mhz memory; 533/800/1066mhz FSB; 4-PCI, 2-PCI Express x1, PCI-Express x16 video slot; Floppy, 2-SATA (RAID Striped and Mirrored), 2-ATA133 IDE ports; ALC655 6-channel audio w/Internal SPDIF Digital out and Realtek RTL8100C 10/100 Fast Ethernet LAN supports WOL. PS/2 mouse & keyboard ports, 8 USB 2.0 ports (4 internal), 9-pin Serial port, Parallel port. Phoenix BIOS with Hardware Monitor for CPU & System Overheat Protection, monitoring for voltages, fan speeds, etc., Supports Wake-on-modem, STR, SMM, APM and ACPI, Break switch for instant suspend/resume on system operations, adjustable voltage and bus speeds. PCPartner RC410AS7-A80C image, PCPartnerRC410AS7-A80C manual. New w/all retail accessories (manual, driver & software CD, IO shield, SATA cable, floppy and ATA133 cables, and TV-out/S-Video backplate header), 1yr warranty.

Speed up XP's Start Menu

The default speed of the Start Menu is slow, but you can fix that by editing a Registry Key. Start->Run regedt32 and navigate to the following key:HKEY_CURRENT_USER \ Control Panel \ Desktop \ MenuShowDelayBy default, the value is 400. Change this to a smaller value, such as 0, to speed it up.If the speed of the Start Menu is slow, even after using the FAQ above, then you might try the following: Navigate to Display Properties> then Appearance then Effects and turn off the option titled Show menu shadow. You will get much better overall performance on your system

Tips & Tricks


Clean Computers :
When it comes to our computers, all we tend to think about is the stuff we see on the screen - the software. Most of tend to neglect the computer itself.What can you do with your computer to make it run longer? Keep it clean.I can't tell you the number of computers I've opened that have been clogged with dust. In fact, I've seen computers fail and have intermediate problems due to excessive dust build up. In addition, a lot of dust in your computer can cause it to run hotter than it should, shortening its life.So, what can you do?I recommend that you open your computer's case (unplug it first) about once every 6 months or so and blow it out with that canned air stuff (you can get it at any office supply store). Of course, be careful not to disconnect or damage anything. Make sure you blow out the power supply (DO NOT open up the power supply unit) and the CPU fan too. Since all this dusting can make a mess, you may want to do it outside.Here's a shot of one of my dirty old PCs. This one uses a Pentium III processor, so its CPU fan is vertical in orientation. Your CPU fan may be flat on the board.Also, make sure you keep your can of compressed air upright. The propellant inside those things tends to come out when the can is inverted or at an angle, so be careful.Oh, if you can get some kind of good "mini-vacuum" that would be OK too. In fact, some would argue vacuums are better because compressed air can force dust deeper into the cracks and crevices of your computer.That said, I still like canned air better for a several reasons.1. I've yet to find a little vacuum that was any good. They all seem to leave a ton of dirt behind on the boards. In my opinion, if you can't get all the dirt off, what's the point?2. In addition, there are a lot of places that even small attachments just can't get to. Again, what's the point of cleaning if you can't get it all?3. I've been cleaning computers since before DOS, and have yet to actually see a problem with using canned air. In my opinion, compressed air simply removes the most dust. So, I'll stick to my little cans, you can still vacuum if you like Finally, no matter how tempting it is, washing your computer with the help of a garden hose is always a bad idea.

Wireless Networking Security Tips


The following tips are very helpful in securing your wireless computer network.
Change the Default SSIDChange the Default Administrator’s passwordDisable SSID broadcast.
Enable Mac Address Filtering
Assign Static IP address to the Network devices and computers.
Turn on and configure the firewall on every computer in your network.
Enable IPSec, SSL, Encryption, WPA and WPE according to your security requirements.

Networking Tips


Computer networks are used to share the data and resources and for the communications. To get the optimized performance, data protection, maintenance, improved reliability and the security, every system administrator and network administrator should know the basic maintenance, troubleshooting and security techniques. Downtime is very dangerous for the critical network business applications and servers. In this article, you will learn some of the best networking tips and by using them you can get the optimized performance from your network.

LANCARD


LANCARD is a family of frame-based COMPUTER NETWORKING technologies for LOCAL AREA NETWORK (LANs). The name comes from the physical concept of the ether. It defines a number of wiring and signaling standards for the Physical Layer of the OSI networking model, through means of network access at the Media Access Control (MAC)/Data Link Layer, and a common addressing format.
Ethernet is standardized as IEEE 802.3. The combination of the twisted pair versions of

Ethernet for connecting end systems to the network, along with the fiber optic versions for site backbones, is the most widespread wired LAN technology

Memory


All data processing and execution takes place within the memory module(s). The program's directions are replicated into memory from a hard drive, external drive or from a network. The processor then extracts the directions from the memory and puts it into the circuit for analysis and execution.
Memory is so important that it cannot be wasted. RAM is allocated by the operating system and programs, and then released when not needed. Errant applications can grip RAM and not release it, which results in a diminishing amount of memory available as you load and use more programs.
If you could actually look into memory, you would be astonished. By watching how much and how quick data and commands are written in and out of it each day, you would realize it is a marvel that it works so well!

VGA CARD INFORMATION


Insert the VGA tightly in the PCI slot of your computer.
In case of no display on your monitor screen, check the VGA cables and make sure that it connected tightly.
Make sure that you are using the updated driver for your VGA card.

HARD DISK INFORMATION


Use a hard disk diagnostic utility to check the status of your hard disk.
Use UPS with your system, it will help your hard disk to avoid bad sectors due to the power failure
Regularly scan your hard disk for the viruses, spware, adware, Trojans and other threats.
Don’t shake or vibrate your computer while it is working.
If your hard disk finds the logical bad sectors, it can be removed with the formatting.

Hardware Tips


Computer hardware includes the physical parts, digital circuitry inside the computer. Different hardware components collectively make a computer unit. Computer with weaker security settings, faulty hardware devices, misconfigurations and outdated software are suffered with different kind of problems. Regardless of the computer hardware problems, there are few basic steps that can avoid many problems. The hardware problems lead to the error messages, system boot up problems, noise from the devices, blue screen errors and the system crash.Normally computer hardware problems are easier to resolve than the software problems. To troubleshoot the system’s hardware related problems, you should have the right tools and techniques. To identify the hardware failure in your system, you need to use a diagnostic utility. It will help you to find out the right cause of the problem.

General Top Tips to speed up your COMPUTER


This post will guide you through the main steps both hardware and software ways to speed up your pc.So let’s get started with hardware tips and tricks to speeding up your computer which is probably the best way to speed up that old computer or even your brand new computer.Hardware Tweaks:

MotherboardTip #1: CPU and Motherboard – The best hardware upgrade is probably your CPU (Central Processing Unit) and motherboard this will also bring other components into play such as hard drives and ram. Your motherboard is going to need to support your CPU and vice versa to work properly the best way to go for regular customers looking to purchase both to upgrade may want to buy in combo deal forms. Newegg, tiger direct and many other sites offer this feature at their stores if you want to go for the extra power like for example a 3.0 GHZ CPU to go with your new board by all means you can go ahead just make sure your motherboard supports it

Tip #2: RAM! – One of the easiest and most common hardware upgrade that adds extra memory and speeds up your system considerably is your computer RAM (Random Access Memory). All it takes is the right memory and a simple opening of the case and popping the ram in place. I recommend sites like crucial before buying to show what your system supports in terms of ram and capacity. After you got your model and amount you want all you need to do is order it and wait for it to arrive. Once you got your ram in hand power down the machine , carefully open the case and look for the your current ram modules remove or add the needed ram and make sure it’s secured firmly then close your case and power up and see if your ram was recognize at your system properties menu.These are two of the most important hardware upgrade that will increase your performance at the top most compared to any software tweak.

SYSTEM UNIT


The system unit is the actual computer; everything else is called a peripheral device. Your computer's system unit probably has at least one floppy disk drive, and one CD or DVD drive, into which you can insert floppy disks and CDs. There's another disk drive, called the hard disk inside the system unit, as shown in Figure 2. You can't remove that disk, or even see it. But it's there. And everything that's currently "in your computer" is actually stored on that hard disk. (We know this because there is no place else inside the computer where you can store information!).

The floppy drive and CD drive are often referred to as drives with removable media or removable drives for short, because you can remove whatever disk is currently in the drive, and replace it with another. Your computer's hard disk can store as much information as tens of thousands of floppy disks, so don't worry about running out of space on your hard disk any time soon. As a rule, you want to store everything you create or download on your hard disk. Use the floppy disks and CDs to send copies of files through the mail, or to make backup copies of important items.

Random Access Memory (RAM)There's too much "stuff" on your computer's hard disk to use it all at the same time. During the average session sitting at the computer, you'll probably use only a small amount of all that's available. The stuff you're working with at any given moment is stored in random access memory (often abbreviated RAM, and often called simply "memory"). The advantage using RAM to store whatever you're working on at the moment is that RAM is very fast. Much faster than any disk. For you, "fast" translates to less time waiting and more time being productive. So if RAM is so fast, why not put everything in it? Why have a hard disk at all? The answer to that lies in the fact that RAM is volatile. As soon as the computer is shut off, whether intentionally or by an accidental power outage, every thing in RAM disappears, just as quickly as a light bulb goes out when the plug is pulled. So you don't want to rely on RAM to hold everything. A disk, on the other hand, holds its information whether the power is on or off.

The Hard Disk

All of the information that's "in your computer", so to speak, is stored on your computer's hard disk. You never see that actual hard disk because it's sealed inside a special housing and needs to stay that way. Unlike RAM, which is volatile, the hard disk can hold information forever -- with or without electricity. Most modern hard disks have tens of billions of bytes of storage space on them. Which, in English, means that you can create, save, and download files for months or years without using up all the storage space it provides.In the unlikely event that you do manage to fill up your hard disk, Windows will start showing a little message on the screen that reads "You are running low on disk space" well in advance of any problems. In fact, if that message appears, it won't until you're down to about 800 MB of free space. And 800 MB of empty space is equal to about 600 blank floppy disks. That's still plenty of room!

What is Hardware?


Your PC (Personal Computer) is a system, consisting of many components. Some of those components, like Windows XP, and all your other programs, are software. The stuff you can actually see and touch, and would likely break if you threw it out a fifth-story window, is hardware.Not everybody has exactly the same hardware. But those of you who have a desktop system, like the example shown in Figure 1, probably have most of the components shown in that same figure. Those of you with notebook computers probably have most of the same components. Only in your case the components are all integrated into a single book-sized portable unit.

Structure of a computer


The Executable ROS contains the executable kernel. It is not an operating system, it's more like a monitor and a bunch full of system routines.
The Feature ROS contains some special functions like the Sort Feature that are not used very frequently. This card is an options and not necessary for operation of the computer.
The Common and Language ROS contain code translation tables, I/O diagnostic routines as well as the APL and/or BASIC interpreter functions.
The R/W Storage is the non-permanent part of the memories with random access (RAM). The data from the display memory section can be accessed from the processor with normal memory accesses and by the graphics adaptor with Cycle Steal operations (also called Direct Memory Access). The data from RWS are gated to the processor by the Read/Write Bus lines and by the Data Bus Out lines on the Base I/O card. The other direction is by the Data Bus In lines to the processor and then by the Read/Write Bus to the RWS.
Addressing of RWS and ROS is done with the Storage Address bits, the processor address bus. Although the bus is only 16 bits wide, the processor can access more than 64kB of code in RWS and ROS (data is limited to 64kB) with a mechanism best described with "code bank switching". This is done in microcode where the fetch of the next instruction is either from RWS or ROS. Data fetches are always from RWS which makes it impossible to read out Executable ROS from within a program.

Ads By CbproAds